Let's convert the recorded voice memo with AI Voice Recognition API at once
When the WAV file was converted into a text and converted it into a text
Let's use the voice recognition API
The accuracy of audio recognition has been improved by the advancement of AI technology.Until now, speech recognition skills have been techniques, but the accuracy has been one step.And it was not a feeling that individual users could use easily.However, recently, the company has been focusing on improving speech recognition accuracy as each company competes.Many readers will actively utilize the AI speakers released by each company.
The major points are that each company, such as Microsoft, Google, and Amazon, provides voice recognition technology in the form of Web API.It is great that you can use voice recognition just by writing a simple program.If you have a large voice memo at hand, you can use the API to make it text at once.
Solutions that do not create programs
You can use voice recognition without creating a program.The easiest way is to use Microsoft 365 Word.Since August 25, 2020, the Microsoft 365 online Word has a voice recognition function.
Let's briefly introduce the use procedure.First, open the Microsoft 365 site in the browser and log in.After creating a new Word document, find the microphone icon on the [Home] tab at the top of the screen.Then, click "Transcript" from [V] on the right side.Next, press the "Upload voice" button to select the audio file.A file in a format such as WAV/MP3/M4A/MP4 can be converted to text.
Use Microsoft Speech to Text API
However, in the above method, it takes time to open a browser and specify a file.It is convenient to create a program when you want to convert a large amount of audio files at a stretch.
So, let's introduce how to use audio recognition using a web API from Python.If you can easily use voice recognition from the program, it is convenient because you can convert a large amount of audio file at a stretch or perform the conversion process automatically according to any event.
As already introduced, various companies provide voice recognition APIs, but this time we will use "Speech to Text" of Cognitive Services / Speech Service provided by Microsoft.By using this, you can easily convert Wav files into text.At the time of writing the manuscript, it can be used for free up to 5 hours per month.

Sign in to Azure Portal to get a voice service key
To use the API, you need to create an Azure account here.Create an account and sign in Azure Portal.
Then, click the "+ Create+ Resource Creation" icon.Azure has many functions, so use the search function to search for "audio".If you find the sound as shown in the following image, click "Create".
Then, the name is "VOICEMEMOCONVERTER", the subscription is "Azure Subscription 1", "(ASIA PACIFIC) East Japan" in the location, "Standard S0" at the price level, and if you select a new resource group, hold down the "Create" button.。
Then, when "deployment is completed", click the "Move to Resource" button.If you return to the home, select "VOICEMEMOCONVERTER" displayed in "Recent Resources".
Then click "Key Management" in "Basic".
Then, the key to use the API will be generated, so let's copy it.Also, "location/region" requires specification, so it is a good idea to refer to the information displayed here.
If the more detailed information or screen has been updated, refer to the Microsoft document.
Let's make a program
If you use a Python library, you can convert various audio files such as MP3 and M4A, but this time the audio file has been converted to WAV format in order to simplify the program.
Here, the WAV file is recognized and "(original file name)).Let's create a program to save under the name TXT.
First, install the required library "Azure-CognitiveServices-Speech".You can install a library for using the Web API by executing the following command on the command line.
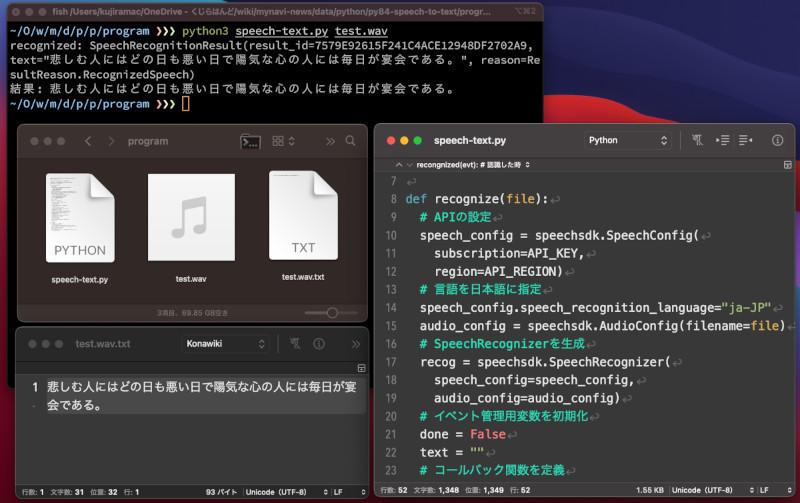
pip install azure-cognitiveservices-speechAnd the following program is "Speech-text.Let's save it under the name PY.In the following ( * 1) API_KEY, it is necessary to specify the key acquired by Azure Portal.
import azure.cognitiveservices.speech as speechsdkimport time, sys# Azure Portal で取得したキーと地域を指定 --- (*1)API_KEY = "*******"API_REGION = "japaneast"def recognize(file):# APIの設定 --- (*2)speech_config = speechsdk.SpeechConfig( subscription=API_KEY, region=API_REGION)# 言語を日本語に指定speech_config.speech_recognition_language="ja-JP"# WAVファイルを指定audio_config = speechsdk.AudioConfig(filename=file)# SpeechRecognizerを生成 --- (*3)recog = speechsdk.SpeechRecognizer( speech_config=speech_config, audio_config=audio_config)# イベント管理用変数を初期化 --- (*4)done = Falsetext = ""# コールバック関数を定義def stop_cb(evt): # 終了した時 nonlocal done done = Truedef recongnized(evt): # 認識した時 nonlocal text text += evt.result.text print("recognized:", evt.result)# 音声認識のイベント設定 --- (*5)recog.recognized.connect(recongnized)recog.session_stopped.connect(stop_cb)recog.canceled.connect(stop_cb)# 音声認識を実行 --- (*6)recog.start_continuous_recognition()# 音声認識が終わるまで待機 --- (*7)while not done: time.sleep(0.5)recog.stop_continuous_recognition()return text# 処理を実行 --- (*8)if __name__ == '__main__':if len(sys.argv) < 2: print("python speech-text.py (file)"); quit()infile, outfile = sys.argv[1], sys.argv[1] + ".txt"text = recognize(infile)print("結果:", text)with open(outfile, "wt", encoding="utf-8") as fp: fp.write(text)After saving the program, you can convert the audio file to a text file by executing the following command on the command line.For example, "Test.To convert a file named WAV, execute the following command.When the command can be executed correctly, "test.wav.A text file called "TXT" is generated.In the case of macOS, replace "Python" with "Python3".
$ python speech-text.py test.wavLet's check the program.As already introduced ( * 1), let's specify the key and area specified by Azure Portal.In the part of ( * 2), the setting is made to use the audio recognition API.
In ( * 3), specify the settings made in ( * 2) as an argument to generate a SpeechRecognizer object.In SpeechRecognizer, a callback event is executed when audio recognition is executed.Therefore, prepare the callback event in the part ( * 4), and set the callback event with ( * 5).
After executing the voice recognition in ( * 6), Time in the part ( * 7)..Wait repeatedly until the execution is completed using the Sleep function.
In ( * 8), the command line argument was obtained to execute the recognize function of voice recognition and save the text after converting it to a file.
summary
This time, we introduced how to use Microsoft's voice recognition API.When I tried it at hand, the result of the voice recognition was affected by the recording state, but if I talked to the postcard and the microphone, I was able to recognize it without any problems.Let's use it because it can be used more easily than expected.

![10th generation Core i5 equipped 9.5h drive mobile notebook is on sale at 50,000 yen level [Cool by Evo Book]](https://website-google-hk.oss-cn-hongkong.aliyuncs.com/drawing/article_results_9/2022/3/9/4a18d0792cae58836b71b9f591325261_0.jpeg "10th generation Core i5 equipped 9.5h drive mobile notebook is on sale at 50,000 yen level [Cool by Evo Book]")


![[Amazon time sale in progress! ] 64GB microSD card of 1,266 yen and wireless earphone with noise canceling function of 52% off, etc.](https://website-google-hk.oss-cn-hongkong.aliyuncs.com/drawing/article_results_9/2022/3/9/c88341f90bab7fe3ce1dc78d8bd6b02d_0.jpeg "[Amazon time sale in progress! ] 64GB microSD card of 1,266 yen and wireless earphone with noise canceling function of 52% off, etc.")